Making your own is SUPER simple, especially in the beginning. You can make batches of single ingredient purées and freeze them; when ready to serve, it's fun to combine with other things such as cereals, meats, etc., or just offer on their own. I promise you, baby's taste buds will love it!
Today, I'll show you how to make fruit purées. I've tried many different ways of preparing it, and my favourite in terms of taste is baking. Yes, it IS more time consuming (but that's just because you have to wait for your fruit to bake), but the outcome is delicious!
 |
| Nectarine purée thickened with oatmeal cereal |
 I started with apples (Royal Gala) an white nectarines (peaches would be prepared the same way). These two fruits take the same amount of time to bake, so I was able to make 2 batches!
Preheat the oven to 400F. Start by washing your fruit well. Cut apples in half and core them (keep the skin on). Cut nectarines in half and wiggle them into halves (it's not as easy or pretty as avocados, but it is doable); take the pit out of nectarines (I used a table spoon to do that, worked not half bad).
Put your fruit into a pan and add water to cover nectarine with about 2-3" of water, and a bit more for apples (since they're thicker). I started with apples facing down and flipped them half way through the baking.
Bake for 40 minutes. Remove promptly and allow to cool.
(If you bake pears, follow the same steps, but reduce baking time to 20 minutes.)
(If you bake pears, follow the same steps, but reduce baking time to 20 minutes.)
Above and the apples, and here are the nectarines after they've baked (I flipped that nectarine to show you what it looks like).
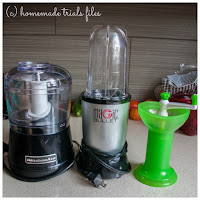
Once the fruit cooled, it's time to purée it! Here are your different options: a food processor (I have a mini Kitchenaid one that I love), a Magic-bullet type (or a blender), or a food mill. I have used that all on various occasions and they all work great (and depending on what it is, even just mashing it with a fork may work great!). However, food mill is good for smaller portions, if you're going to make a big batch, pick something with a bit more power. This time, I chose the mini.
Since they are now baked, the skin should be very easy to pull off the apples. A minute in the food processor, and you have a smooth purée (I didn't need to add any water; if you do, add a little at a time, using the water that the fruit baked in).
Nectarines are even more mushy, so it's best to slide the fruit off its skin straight into the processor. In even less time than with the apples, and you have another batch ready!
Finally, storing your fruit purées: I first spooned everything into their individual containers and refrigerated. However, keep in mind, that they'll only last in the fridge for a few days, so depending on the amount, you may what to freeze purées in ice cube trays or some small portioned freezer-safe containers.
You can offer these purées on their own, or mix with baby cereal, meats or veggies. Your baby will love it!
Final tip, never feed your baby out the master container that you think of returning to the fridge if your baby doesn't finish. This introduces bacteria into the food that will spoil the whole batch.
Cheers,
Nadia.


No comments:
Post a Comment